
Building the Black Gate
The Land of Shadow
© Lotrscenerybuilder 2009
All seemed ruinous and dead, a desert burned and choked
Day came, and the fallow sun blinked over the lifeless ridges of Ered Lithui…
.jpg)
The land seemed empty. North amid their noisome pits lay the first of the great heaps and hills of slag and broken rock and blasted earth, the vomit of the maggot-folk of Mordor; but south and now near loomed the great rampart of Cirith Gorgor, and the Black Gate amidmost, and the two Towers of the Teeth tall and dark upon either side. (RotK, page 195)
The Green Dragon, the Argonath, Minas Morgul … it needs more than a building or a few statues to recreate the marvellous world of Middle-earth. In order to make your constructions feel at home you will have to devote some time and energy to a matching environment. Now, if you are not (yet) familiar with this scenery building business, you might easily overlook the trouble it takes to construct, say, the hilly farmland near Bywater Pool or the cliffs along the Anduin River. In many respects these terrain boards are ‘buildings’ in their own right. The Morgul Vale board for example, with its intricate system of lighting channels and its ruined city quarter extra muros, took weeks to build.
.jpg)
Not the imprisoned moonlight welling through Minas Ithil long ago,
but the yellow glare of a 300 Watt construction lamp beneath the table!
Now, to complete your miniature of the Black Gate you might want to construct the stony plain in front of the gate, as well as the hills on either side. Unlike the preceding Black Gate-articles this supplement will inform you in rather general lines about our way of approach. But that shouldn’t be much of a problem for someone who went through the burly gates already.
The Morannon board template can be found at the next link:
http://www.lotrscenerybuilder.org/downloads.php
| Materials used: | MDF (6mm thickness) |
| Small broken stones | |
| Modelling gravel | |
| Wood glue | |
| Texture Paint | |
| Filler | |
| Polyurethane foam (spray can) | |
| Paints used: | Anthracite Grey |
| Black | |
| Primer White | |
| Chocolate Brown | |
| Reseda Green | |
| Orange Red | |
| Tools used: | Fretsaw (sawblade no. 6) |
| Handsaw | |
| Hobby knife | |
| Sand paper (fine grain) | |
| Set square | |
| Ruler | |
| Brush | |
| Filling-knife |
Step 22:
The Last Departure … Now for it, Mr Frodo!”
In this way our Cirith Gorgor was built: for starters we used a 110cm x 100cm MDF board with a thickness of 6mm. Next we made our drawings as shown on the Morannon template:
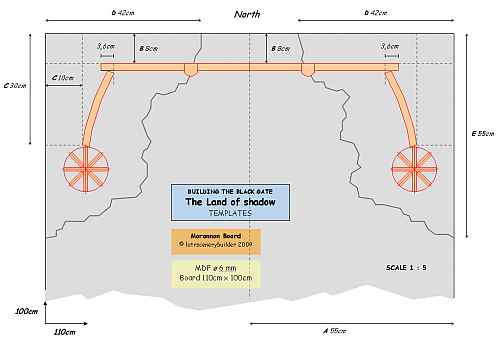
– a vertical line at 55cm (A) to divide the board in two identical halves;
– a horizontal guideline at a distance of 8cm measured from the northern edge (B);
– a 10cm x 30cm rectangle (C) on either side of the board;
– two marks (D) on the northern edge at a distance of 42cm from either side;
– two marks (E) on either side of the board at a distance of 55cm from the northern edge.
.jpg)
We wanted to build a gaming board that could be taken apart in order to make it easy to handle and to stow away. We had but a few options though, as most of the gate elements would become locked in polyurethane rockeries. We decided to create two separate tower units; each one would contain a Tower of the Tooth, a Witch-king wall and a Gatehouse element, all firmly set in foam. Both units would fit into the master-board like pieces of a jigsaw puzzle.
.jpg)
Now in a natural environment it’s very unlikely that you are going to find straight lines; everything seems to be curved, twisted, erratic… That’s why we drew these cauliflower ears on either side of the board: to give the joints between the different board segments stealth qualities when put together. Note that we used the D and E marks on the Morannon template to determine the dimension of each ‘ear’. Also, we made sure that there was enough space available within the lines to put in place all named gate components, with room to spare for a rock slope. You won’t tell from the photographs but these ‘ear’-segments are pretty big. Our fretsaw didn’t reach that far into the board so we used a handsaw to cut off the corner plates …
.jpg)
… to make it possible to fret out the cauliflower shape.
.jpg)
Next, the matching ‘waste’-strips were glued back against the master-board …
.jpg)
…on both sides.