
The making of Barad-Dûr
Part one – Page three
© Lotrscenerybuilder 2009

Gradually we worked our way downward. A section of the cardboard cylinder was removed and replaced by a panel with windows and arches (in retrospect, we would’ve liked to have even more difference in layers and depth on this particular level of the tower).

Despite its scale and its wide diversity in details the Barad-dûr has only two major ‘key-problems’: the twin horns at the top and the ‘lop-ears’ on both sides of the pinnacle. John Howe included them in his design of Sauron’s lookout balcony as rather nondescript embellishments but the Weta modellers opted for a more striking elaboration (we think these ears and horns played a major role in Mary MacLachlan’s distress when she found out that her miniature “… was true to John’s drawing, but it wasn’t quite [Peter Jackson’s] Barad-dûr”; sure enough, the Galleries in the TT Appendices show an early sculpture of the Dark Tower were these illustrious features are barely visible).

We started with cardboard with a thickness of 2mm to model the ears. Likewise parabolic in form, we glued these four ‘pendants’ on top of each other against the tube. Small strips of cardboard filled up the space in between. Finding the right dimensions and shape took its time; it was a matter of trial & error.
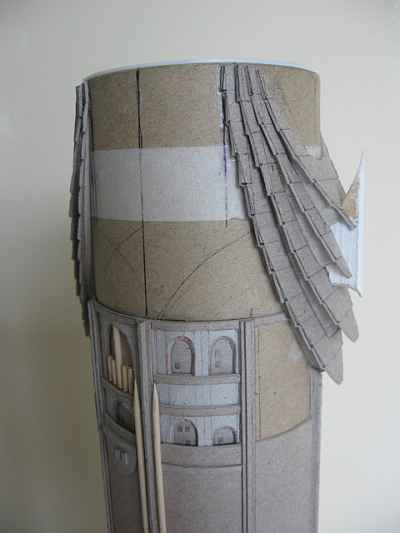
However, the 2mm cardboard turned out to be the wrong choice: with the last ‘pendants’ glued in place, our tower was now blessed with… an imposing set of antlers! After a disturbed night we tore down the whole affair first thing the next morning and had another try with flaps of 1mm cardboard.

The balcony and the secondary pinnacles were made from MDF and jazzed up with cocktail-prickers and small bits of cardboard. In the end, when being covered with structure paint and our famous multi-coloured black finish, all these different elements together would become a ‘dark and brooding’ entirety. Meanwhile, we checked the silhouette of the tower by blocking the light with the tube and studying its shady side.
This picture in particular made us very happy; it felt like the Dark Tower was already in the bag.

Our rejoicing was somewhat premature. For another Ring had to be made. Now we could have done with some modelling putty to sculpt these spikes. But after ages of scenery building we feel strongly attached to our own range of materials: wood, paper, sticks & filler. We made little ‘noses’ of cardboard which were glued onto a cardboard ring; a cocktail-stick acted as a ‘spine’ for each nose. To give each spike a curve, the sticks were carefully broken in the middle and slightly bent apart. Filler was used to perfect their shape.

We would encounter a score of construction puzzles in the weeks that followed, but none of them as tricky as this Master Ring!
There’s a lot that these pictures don’t show. For example, we had to remove an earlier version of this ring – already firmly glued to the tube – after concluding by hindsight that the position of the spikes differed from the movie pictures. We were however wrong-footed by a picture of Barad-dûr on page 60 in Sibley’s “Making of the Trilogy“, which shows these spikes in a more upright position and slightly further away from the tower (as far as we know there were at least two ‘bigatures’ or scale models built of the Dark Tower, apart from MacLachlan’s earlier sculpture(s?); the one on page 60 figured in the Two Towers film poster, the (bigger) one on page 55 was used for the panning scenes in the first two movies).

The approach for the receding buttresses against the tower-tube was already invented years ago: we used small strips of MDF – with different widths and lengths – as a base for each column. After that, it became a matter of dressing up both these columns and the empty spaces between them.

Windows, archways, cornices, pilasters and balconies were cut from cardboard: most of them many-layered, none alike. It wasn’t a problem to construct all these features but the translation of what we saw in the pictures into structures of paperwork took some improvisation.
At this level, however, the modelling was still clearly structured. As we continued our struggle downwards the fortress would expand ever more, with a proportional increase of details in every nook and cranny.

Small details such as horns, spikes, strips and ribs were added to create the impression of intricate architecture. Later on, a layer of structure paint would hopefully deepen this illusion even more (adding trillions of details is common strategy in the miniature business, whether it concerns warships, spacecraft or Middle-earth scenery: the more trinkets one puts onto a model, the bigger and more lifelike it looks on screen. Every ordinary utensil can be used on these fantasy props: MacLachlan for instance confided that they used halves of Ping-Pong balls for the domes of Minas Tirith – just have another look at the ‘Istanbul’-shot in the FOTR movie!).

It took a couple of days to decorate these columns all the way round. We didn’t have the patience to postpone the final painting until the moment the whole fortress would be completed. Instead, we decided to finish each stage separately; in the end we would apply a superficial, overall finish to integrate all parts into a single miniature.

The most demanding part of every building project is taking the ceremonial photographs. There’s always more about a miniature than meets the lens! (the only model that didn’t give us any difficulties was that of the Three Dwarven King Statues at Moria’s Westgate: just one hour and a single spotlight sufficed to pin down the gloom & doom of Khazad-dûm). The first pictures of the ’topmost tower’, however, showed some black looks… which raised our hopes.